Living That Oily Life

When you get your starter kit, what do you do with it? Here is how I use each of the oils in the starter kit. There are soooo many other ways, and I can also show you how to get ideas with the resource app I will help you get.

Oils that you get in the starter kit:

1. Copaiba: I use this as a base in my homemade perfume. Smells yummy and I combine it with spruce, tangerine, and vanilla extract (and water and witch hazel. Let me know if you want the recipe or info on how to make your own perfume). Heaven!

2. Thieves: I use this in a roller (I can show you how to make these, it’s easy!) on the bottom of my feet when I feel like I’m getting sick.

3. Lemon: cleans so much. Gets sticky stuff off. I used it to get pitch off my hands! I also used it to clean the spilled mineral makeup that had stained my quartz countertop. It comes off when nothing else worked! Add it to your water for flavor. Diffuse it to smell like sunshine.

4. Peppermint: probably my overall favorite oil, besides valor. I dab it on my head straight when I’m getting a headache. I’m not trying to say this can cure any disease so don’t tell the FDA, but it is very soothing to me and that’s all I’m saying I’m writing. I carry it with me everywhere. I’ve also used a drop in water when I don’t have gum and my breath is gross, or to help settle my stomach.

5. Digize: for stomach issues, just apply topically. The smell of fennel is a little too much for me. But it wooooorks. I made a roller with digize and some peppermint (to distract me from the smell) and it totally works!

6. Citrus Fresh: I diffuse this all the time at work. It’s very calming and helps me feel focused. It’s also the oil that my boss loves the smell of, and since we share an office, this is key!

7. Frankincense: great for skin. I make my own moisturizer with it, but you could also put a few drops in your regular moisturizer. I’ve used it in bath salts. It has a rich scent, it could also be a good perfume base note. I used enough of it that I ran out, so sadly I haven’t used it in a while.

8. Raven: I use Raven when I’m feeling sick, especially any kind of congestion. I made a roller that I put on my neck, chest, and back. I diffuse it as well.

9. Lavender: all of the things. I will mix it with epsom salt and baking soda to make homemade bath salts. It takes two minutes maybe and then I keep them in a pretty jar on my counter for whenever I have time for a bath. Okay. Not that often. If I burn myself, I’ll put it on the burn and it feels much better. For a sunburn, I put a few drops in my aloe lotion. Of course I diffuse it, often mixed with other oils. Lavender and peppermint together is delicious! Sometimes I’ll use a toothpick drop in a cocktail or in lemonade.

10. Stress Away: this is a blend that contains a bit of vanilla extract. Vanilla is my favorite scent, and there’s no such thing as vanilla essential oil. This blend is the answer! I have a small bottle at work that I smell when things are overwhelming to help me remember that work stress is a small thing. It smells delicious. I also diffuse it sometimes at bedtime.

11. PanAway: I have two back up bottles of this, besides the open bottle on my oil rack. I love the smell (it has a bunch of mints in it) and I use it when I have sore muscles. I have also used it in bath salts, but you need to do this in moderation because some people don’t like the tingling feeling that mint will give you!

12. Tangerine: I mentioned above that I use it in my perfume. I also diffuse it- so freaking good. Some people use it in water.

Hit my up if you have more questions, or tell me what your favorite oil is!

Jillian

DIY Essential Oil Moisturizer and Eye Cream

Ingredients on the counter

The first thing you may notice is that there are a lot more ingredients on the counter than in the recipe. Well… that’s because I also made body butter, but it SUCKED. So, we’re not going to be sharing that recipe just yet.

You may also notice there is an alcoholic root beer with the ingredients. It’s not part of the recipe, but I do recommend adding it to your shopping list. You’re going to be whipping moisturizer for a while!

Moisturizer recipe

This was honestly meant to just be moisturizer, but it turned out pretty thick and makes an awesome eye cream. Here is the recipe:

DIY Moisturizer and Eye Cream

1/2 c shea butter

2 T sweet almond oil

3 T arrowroot powder

1 T water

10 drops frankincense oil

10 drops lavender oil

Melt shea butter in a double boiler with almond oil, until liquid. Transfer to a freezer safe bowl and freeze for 15 minutes, until the outside edges are becoming solid but the center is still liquid. Then whip with a mixer until you have reached your desired consistency (this took me about 10 minutes). Add arrowroot powder 1 T at a time, it should make it a bit thicker and less greasy. I needed to add a little water at this point, as well. Then add the essential oil(s) of your choice. If you plan to use this during the day, be sure you are not adding any oils that are photosensitive, and always make sure your oils aren’t oils that will burn the skin (an example of one NOT to use would be cinnamon). Leave me a message if you have questions, and see my disclaimer for info about essential oil use!

Melting shea butter

I don’t have a double boiler, so I put my shea butter and almond oil in a Pyrex measuring cup in a pot of boiling water. This works great because it has a handle, pour spout, and measurements, but if you do this be super careful when taking it out. I wore huge oven mitts to avoid a steam burn.

Oils out of the freezer

This is what mine looked like when I took it out of the freezer- almost like a candle that has been burning for a while.

Whipping moisturizer in a bowl

I mixed for a while after this, until it looked almost like butter. I ended up with a really thick cream. If you want it thinner, I would try 2 T of arrowroot powder and a little less whipping time.

Moisturizer in the jar, with the lid off

This recipe filled up two 2 oz glass containers, which I just labeled with super basic info. You could make it way cuter, but I… have no excuse. I didn’t. But I do still like how it turned out.

Finished moisturizer

I have been using this for two weeks now and I really like it so far. I use it as night cream, and then just under my eyes during the day. I chose these two oils to add because frankincense may help with scarring and wrinkles, and lavender may help with acne, sensitive skin, and wrinkles. I used the shea butter because it won’t clog your pores (my other option was cocoa butter, which definitely will!). Sweet almond oil is in between, but I used it because I just bought some and it’s good for sensitive skin. Let me know if you try it!

Jillian

How to Make Dry Shampoo

ingredients for dry shampoo
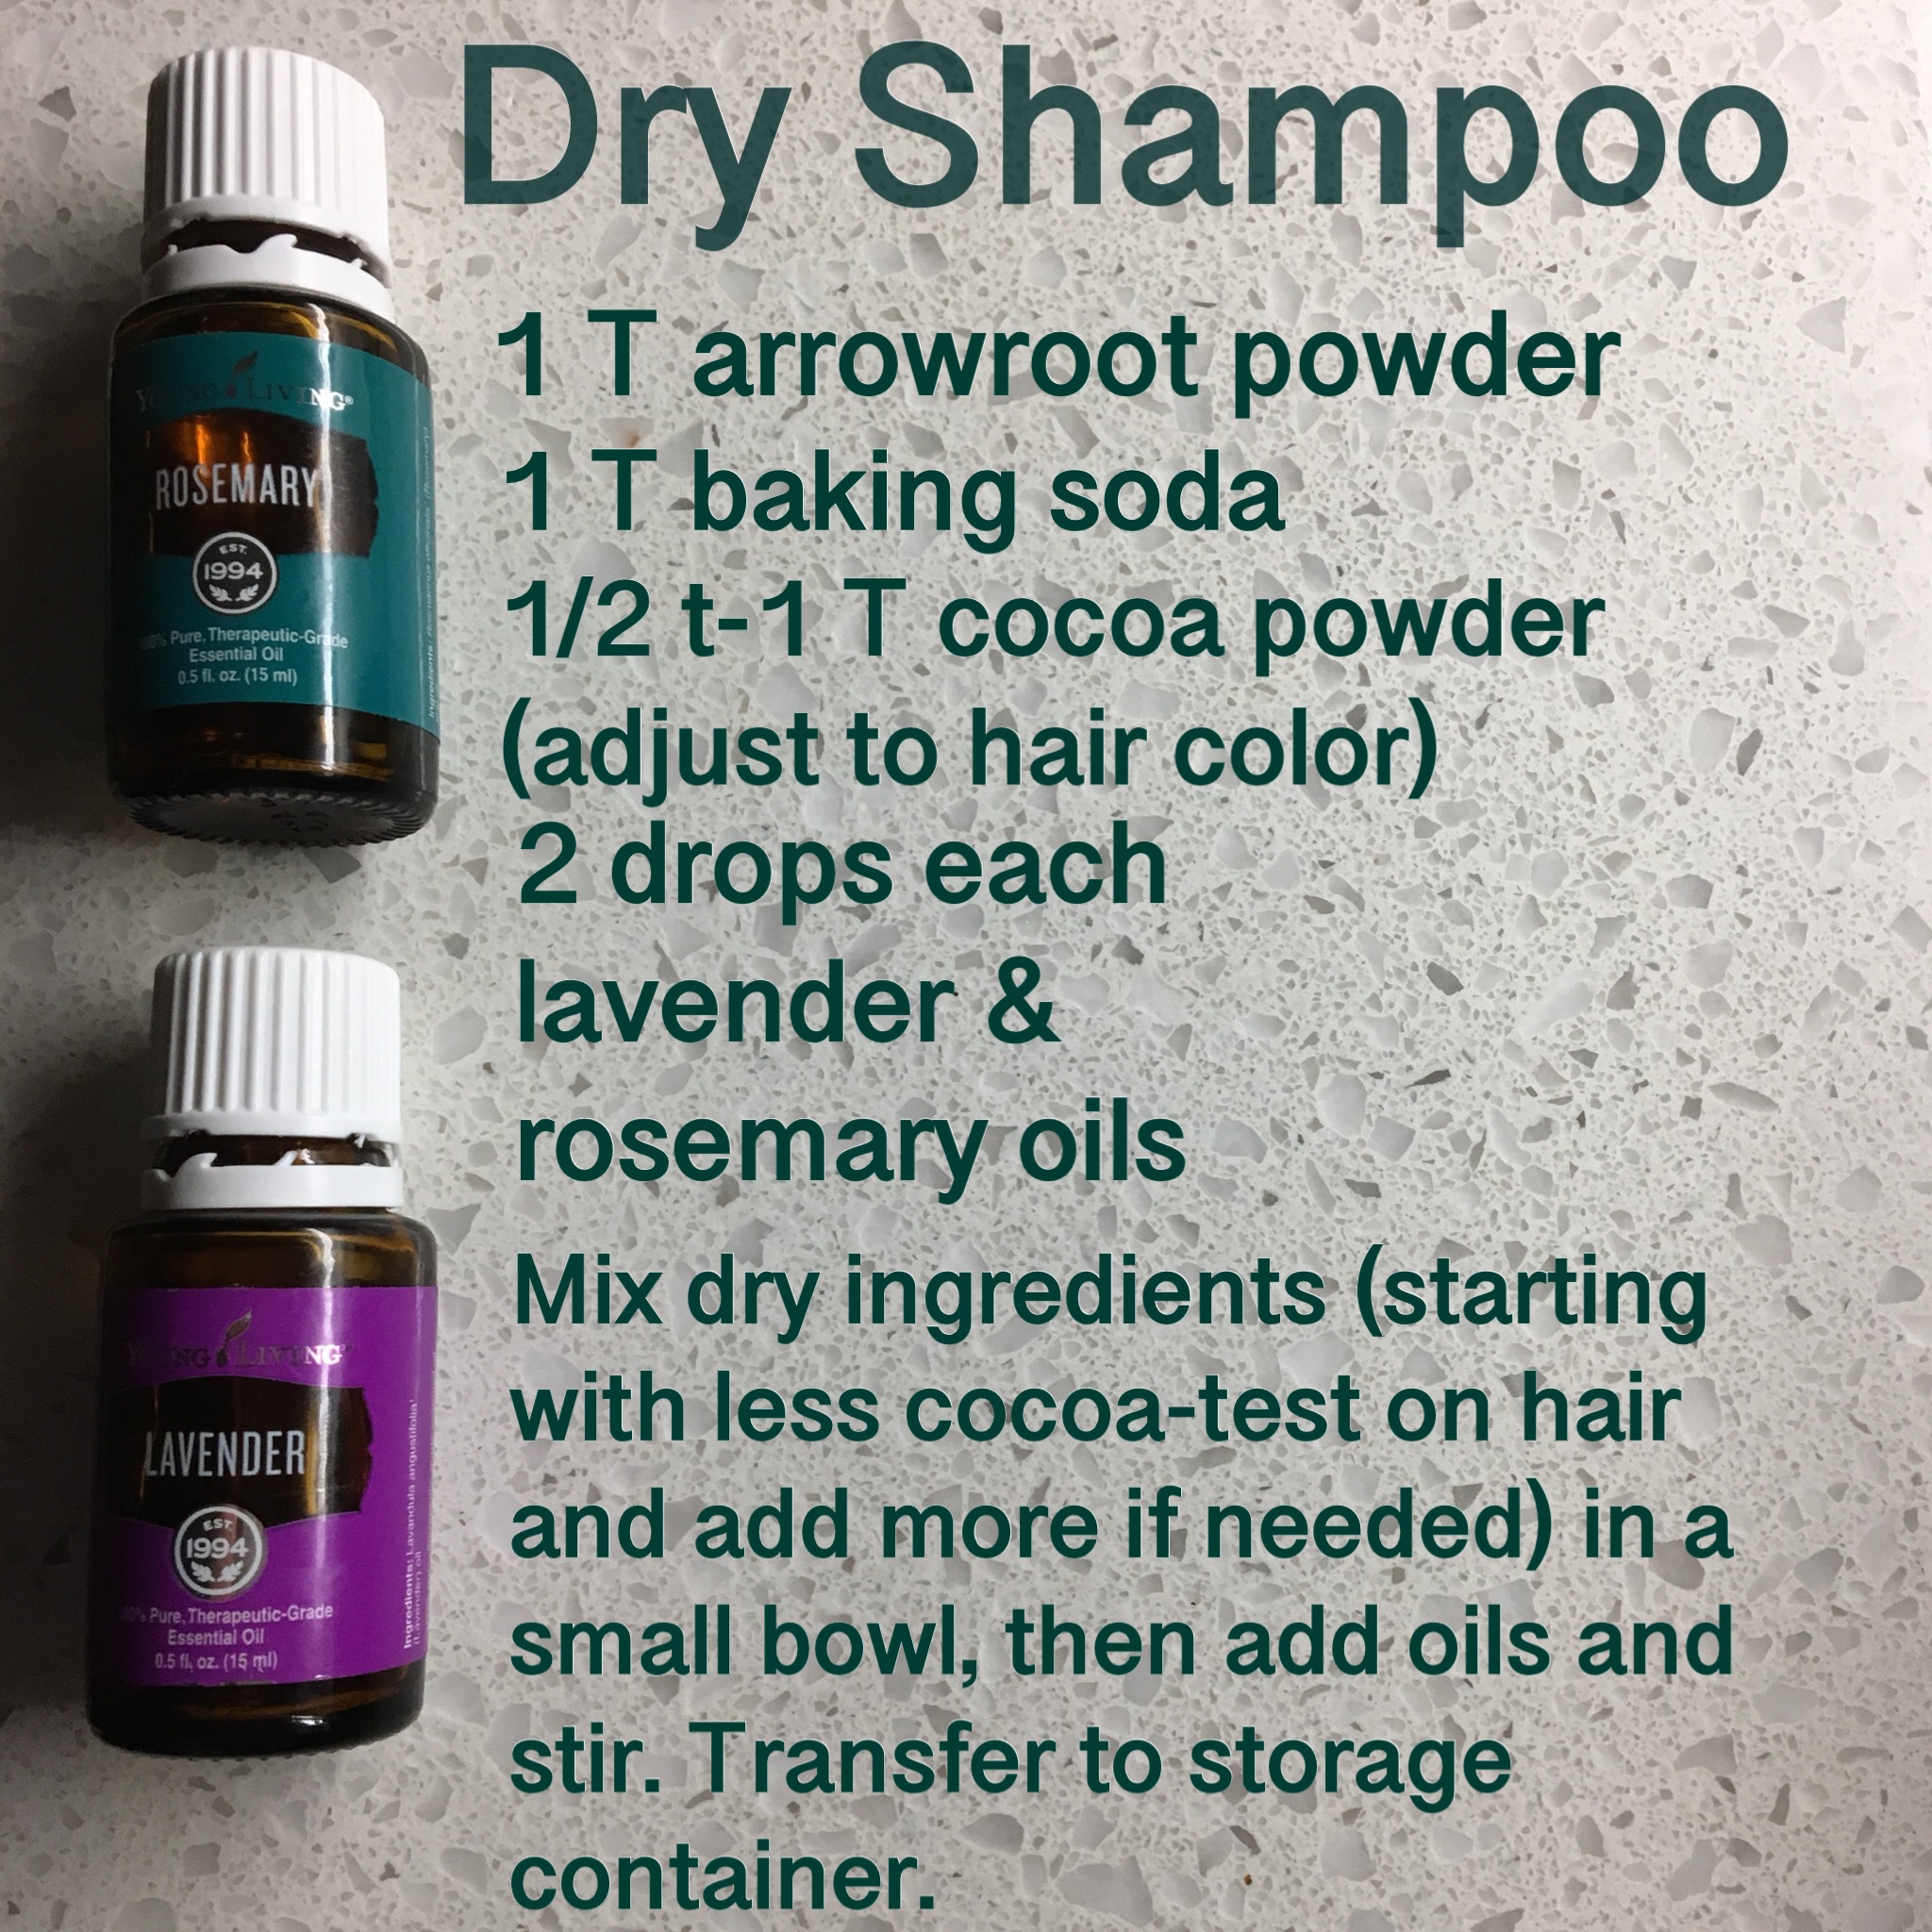
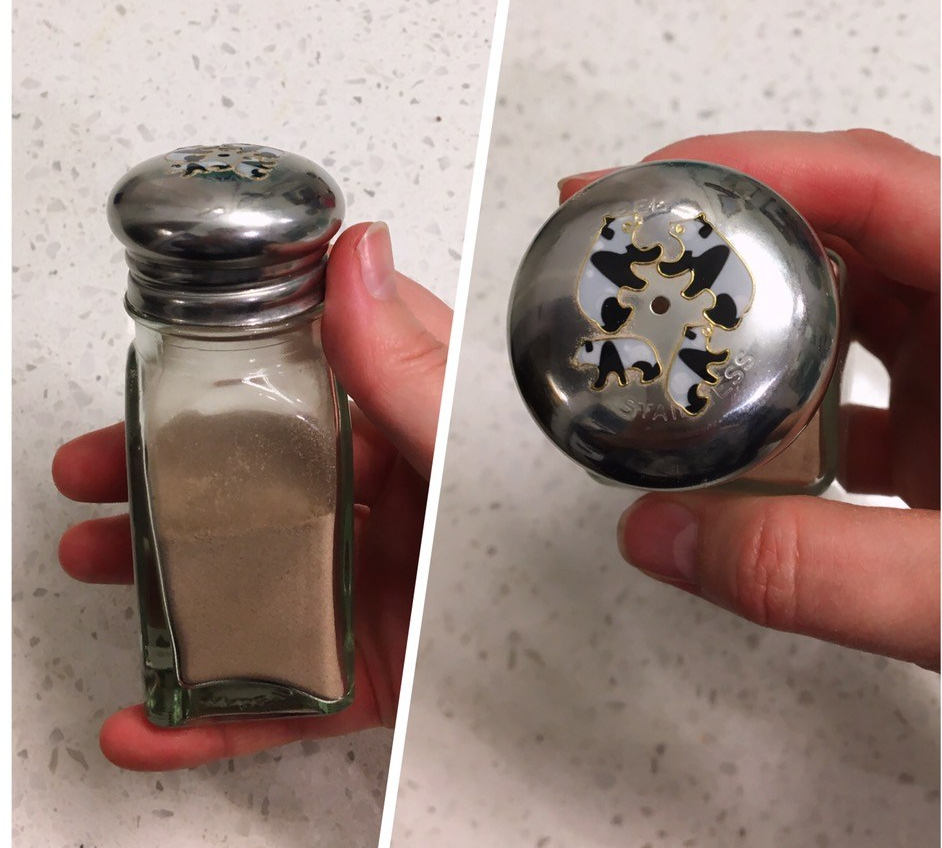
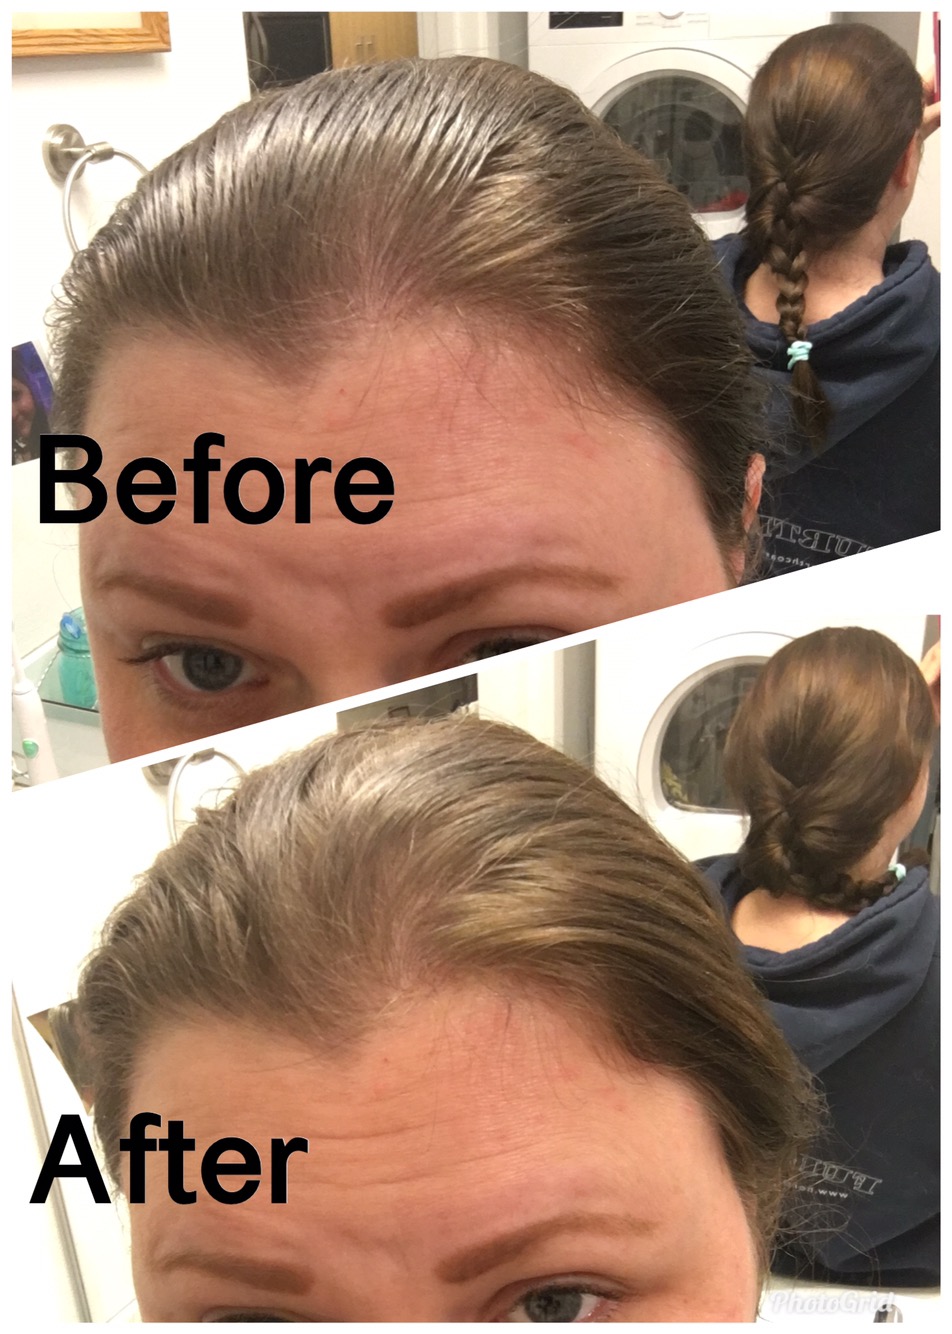
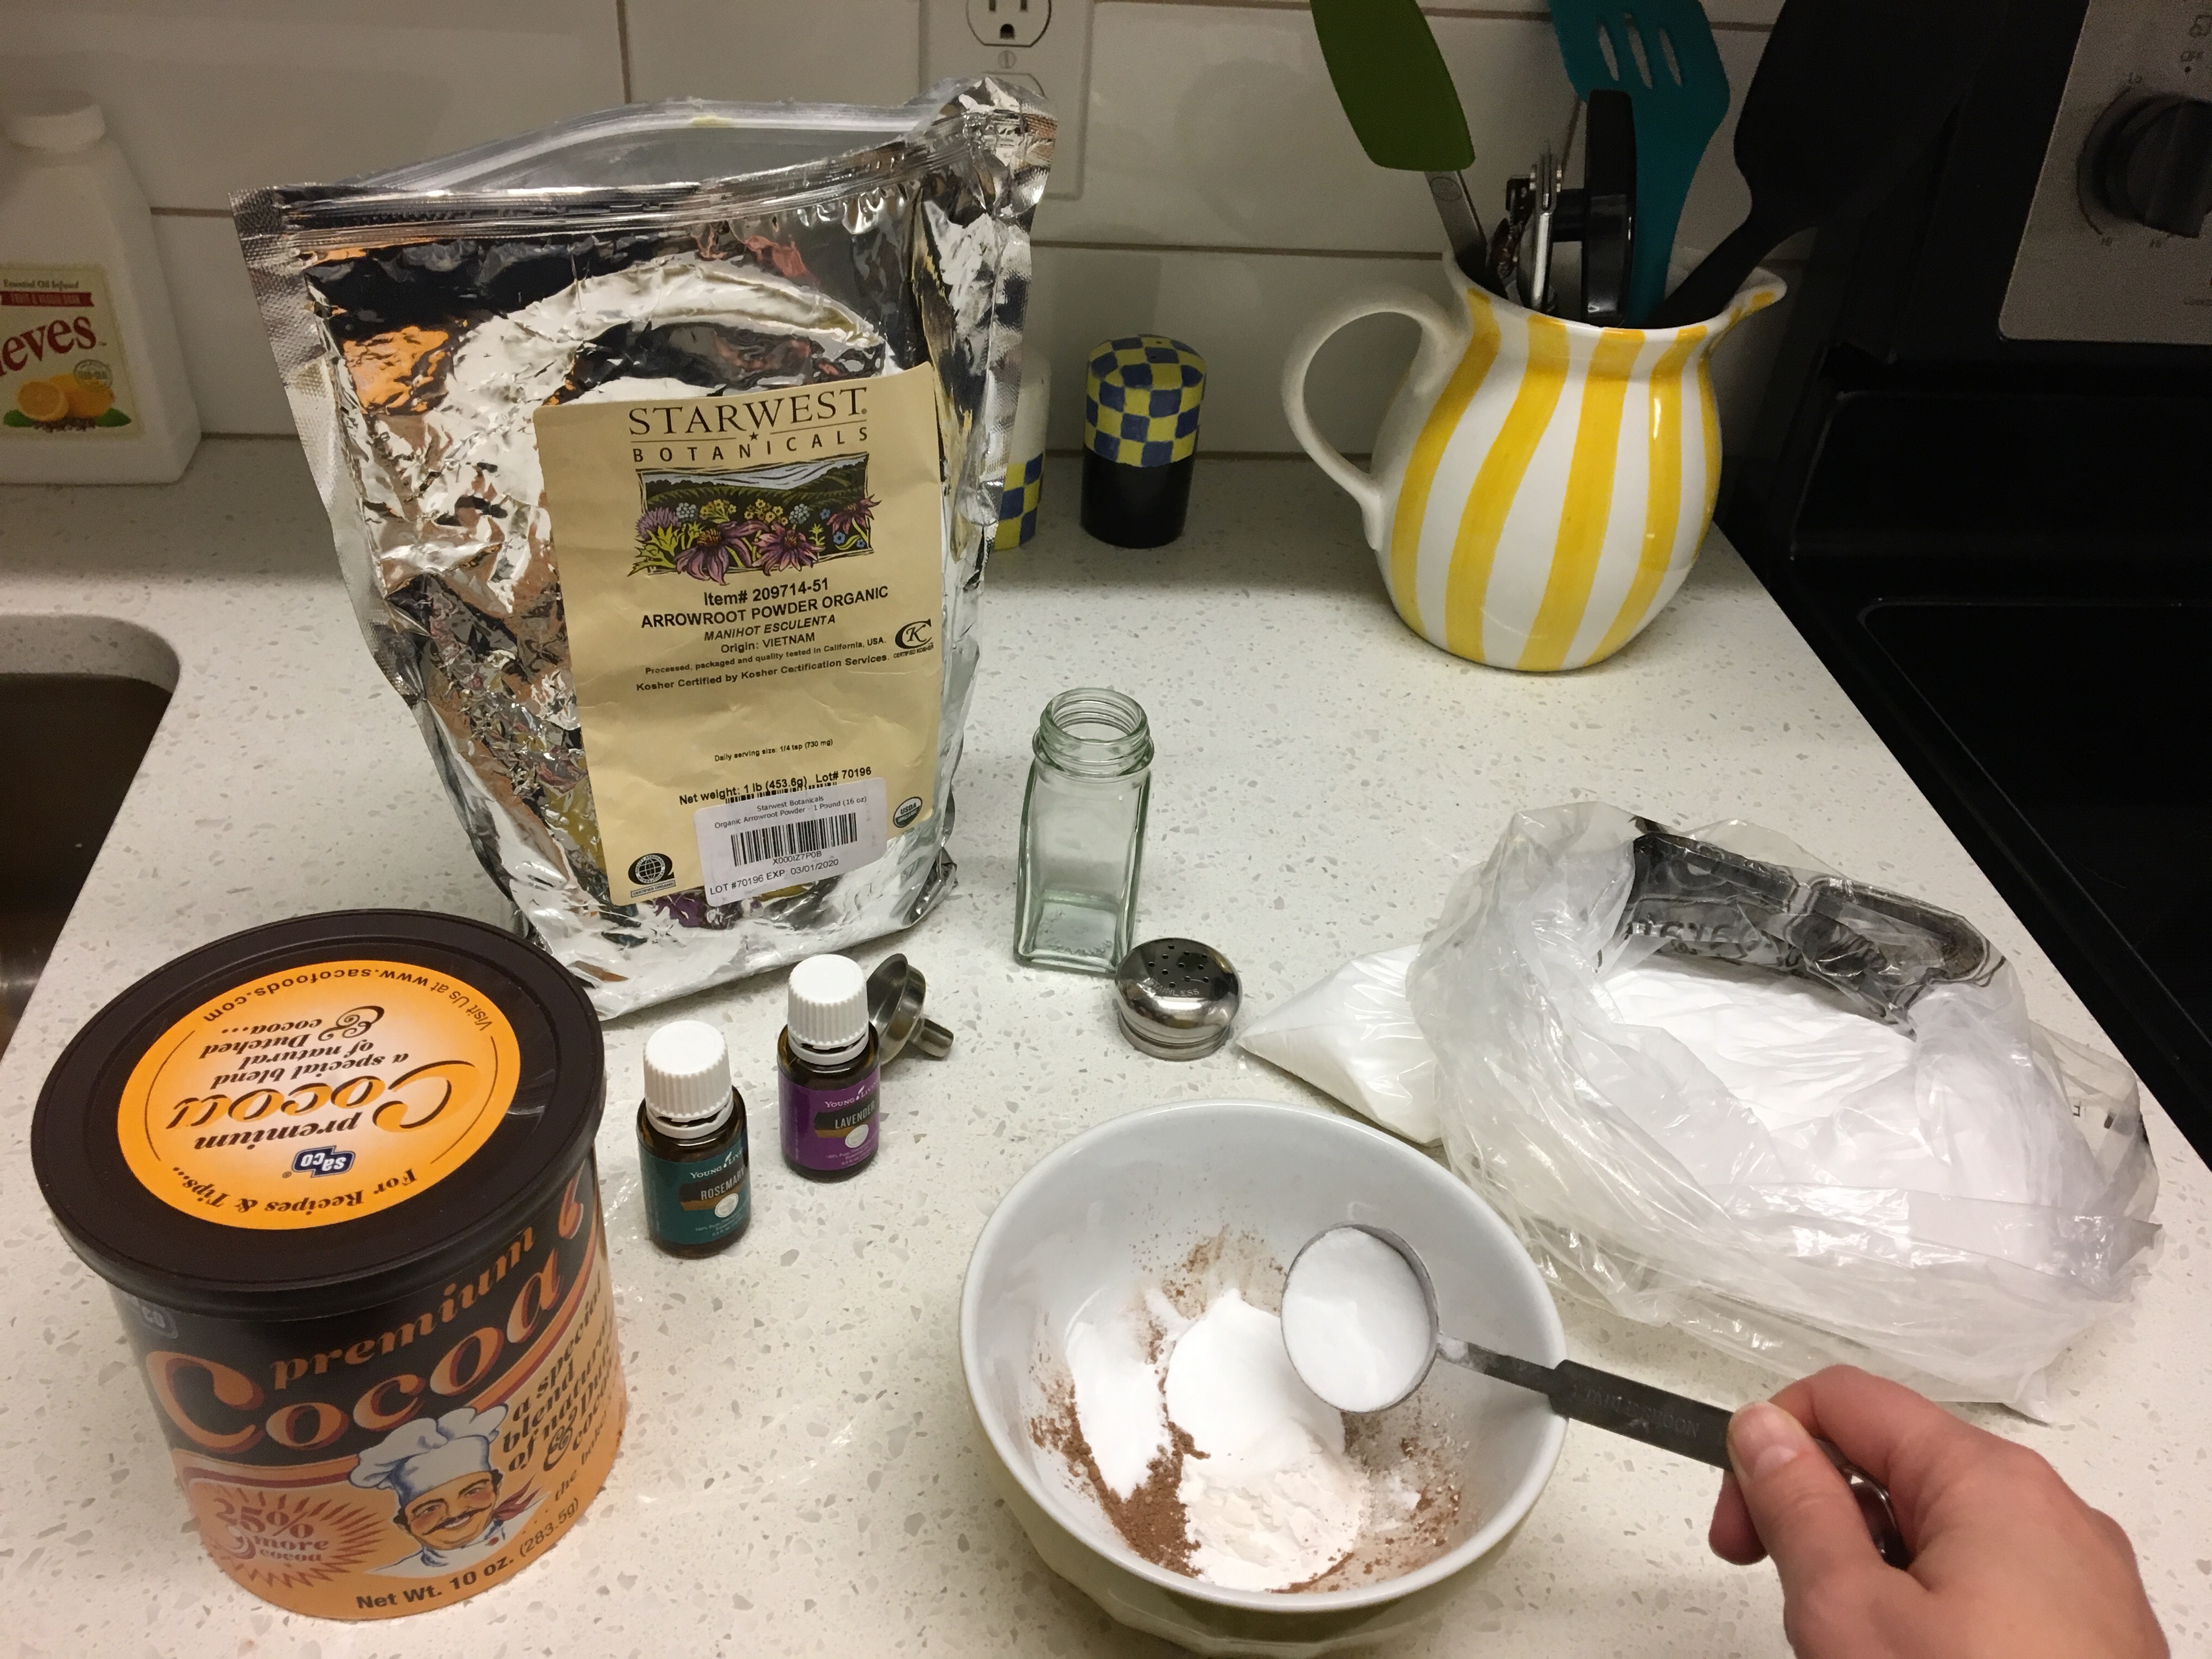
My hair is so greasy, it makes me want to scream. I am done with washing my hair every day, so dry shampoo is a must.

I decided to try making my own for two reasons: my current product is white, and a pain to rub into my dark hair; and ever since I downloaded the Think Dirty app (NOT what it sounds, it tells you how toxic your products are and makes you want to throw away everything you own) I have been freaking out about everything. 10 is the worst score something can get.

Think Dirty app- Bumble and Bumble dry shampoo
Bumble and Bumble has some dry shampoos that do pretty well in the app, but of course not the one I happen to have (which cost something like $30). You can make this dry shampoo for super cheap, and you can customize the amount of cocoa powder you add to help it blend into your hair. I started with 1/2 T. of cocoa powder and went up to 1 T. I might even add more. For light hair I would start with just a tiny bit, or maybe even skip it. I simply mixed together the dry ingredients and put a little in my hair to test the color. Then I added more cocoa until I was happy, then stirred in the oils.

dry shampoo recipe

Recipe for those who can’t view the image:

Dry Shampoo

1 T arrowroot powder (can substitute corn starch if you don’t have any. It also might be available in the spice section of the bulk bin department at your local store)

1 T baking soda

1/2 t – 1 T (or more) cocoa powder, adjust to hair color

2 drops rosemary essential oil

2 drops lavender essential oil

Mix dry ingredients together in a small bowl. When well blended and the color is to your liking, stir in the essential oils. I chose rosemary and lavender because they can help to promote hair growth and decrease dandruff. You can use any oils that work for you! Please see my disclaimer here for more info about the use of essential oils.

finished dry shampoo, inside salt shaker

When you’ve finished your dry shampoo, you can store it however you like. Some people just use a bowl and apply it with a makeup brush. Please let me know if you’ve tried this method! I didn’t have an extra brush, so I decided to try a salt shaker. If you do this, I highly recommend you put stickers over most of the holes OMG. I shook it over the top of my head and stuff was a little touch and go for a bit. Let’s just say, I didn’t quite realize how quickly it would pour out! The good news is, my new dry shampoo has bears now!

hair before and after dry shampoo

These are definitely not the most flattering pictures of me, but I wanted to show you my hair before and after I tried out the finished product. Pretty good, right?!

Another interesting thing is I tried this last night, then used just a tiny bit this morning for volume. My head doesn’t itch today, and usually it does with my normal dry shampoo. Victory!

Let me know if you try the recipe!

Jillian 

Delicious Rum Balls (and Vodka Balls!)

Delicious snacksI was having a hard time deciding what to bring to the New Year’s Eve party, when suddenly it became so clear. Just put liquor in everything! 

I primarily drink vodka, and didn’t want to have to buy very many ingredients; so I decided to make vodka balls! When I got home I remembered that I did have a little bit of coffee flavored rum, so I made two different flavors (that is why the ingredient list below will seem odd- it’s actually two slightly different recipes in one). 

Chocolate Coffee Rum Balls • Peach Whipped Cream Vodka Balls 

  • 11 oz. box Nilla Wafers (mine smashed down to 3.5 c)
  • 1.5 c powdered sugar (may need more, depending how messy you are)
  • 1.5 T cocoa powder 
  • .5 c chopped hazelnuts
  • 2 oz. coffee rum
  • 1 oz. whipped cream vodka
  • 1 oz. peach vodka 
  • 2 T real maple syrup

First, crush the cookies and chop the nuts. You could probably use a food processor for both. That is so not what I did. I bought the nuts chopped. The cookies I put into a ziplock bag (in three batches) and smashed the hell out of them with a rolling pin. The dogs were not impressed by this at all. I also will add, don’t try to do this just in the bag the cookies come in. There is too much air. It will burst and cookies will fly out. Not saying how I know or anything… 

Then get out two large bowls. Pour half of the cookie crumbs and half of the nuts in each bowl. Add half a cup of powdered sugar to each bowl, and 1 T of cocoa powder to one bowl (this will be the rum ball bowl). The remaining powdered sugar and cocoa powder is for rolling the balls in at the end. Stir the dry ingredients in each bowl until well mixed. 

When the dry ingredients are combined, and 1 T real maple syrup to each bowl. Add the coffee rum to the rum ball bowl (the one with the cocoa powder) and the vodka to the other bowl. Combine wet and dry ingredients. Then put both bowls in the refrigerator for 30-45 minutes. This allows the flavors to meld and the consistency to set a bit.

When the mixtures are done refrigerating, form them into balls (mine are about an inch, but do whatever you want). Split the remaining powdered sugar into two bowls, and add the remaining cocoa powder to one bowl and stir to get chocolate powdered sugar. Roll each ball in the sugar (rum balls in the chocolate, vodka balls in the plain). Refrigerate until ready to serve, and cover tightly so they don’t dry out. 

That’s it, you’re done! I’m told they get more flavorful if they sit overnight or even for two nights. I wouldn’t know. Mmmmmm. 

I ended up with 24 balls. I probably ate at least two worth of dough while prepping, so there’s that. 

What kind of alcoholic snacks have you made? I want more snack ideas! 

    Jillian

    Breakfast Cookies

    raw cookiesWhen J worked at home, I used to make a smoothie every morning and leave it in the fridge for him.

    Once he got a job downtown, he didn’t want the hassle of drinking a smoothie.

    I kept suggesting things for him to eat for breakfast, but the only things he wanted were prepackaged things. He didn’t want any prep work, reheating, etc.

    Then I thought of breakfast cookies. I wanted to make them myself, both to save money and make sure they were healthy. I first tried the Fitnessista’s recipe, but found that I needed to adapt it to get the texture he wanted and to have them last all week. I make five giant cookies on Sundays. He takes them to work on Monday and eats them all week with a piece of fruit. Here is my recipe- which is still mostly Gina’s 🙂

    baked cookiesBreakfast Cookies– Makes 5 large cookies 

    Preheat oven to 350

    • 2 cups oats
    • 2 scoops protein powder (any flavor)
    • 1/3 cup flour
    • 1 teaspoon baking soda
    • 1/2 teaspoon sea salt
    • 1/3 cup peanut butter
    • 1 egg
    • 1/8-1/4 cup almond milk (to desired texture)
    • 1/4 cup chocolate chips
    • 1/4 cup dried cranberries
    • I change it up every week, but not much. Sometimes I switch the fruit, use butterscotch chips, coconut, etc. Whatever strikes my fantasy 🙂

    I mix all the dry ingredients together, then the wet ingredients. I stir them until they’re cookie like texture, adding a little more almond milk or flour if necessary. Then I make the dough into five cookies with my hands.

    Bake for 12-14 minutes, until the edges are brown. Leave on the cookie sheet for five minutes, then transfer to a cooling rack.

    Now you have a healthy, protein filled breakfast for the week 🙂 You can also try Gina’s original recipe. I don’t know why it didn’t work for me, maybe because the weather is so different in Portland than in Tucson.

    Let me know if you try them!

    Jillian

    My Green Drink is Way More Delicious Than Green Beer

    cloverI LOVE St. Patrick’s Day. Maybe because I’m Irish, maybe because I love to drink, maybe because I hate snakes. I don’t know. I wore this little four leaf clover sticker on my face all day, and put them on anyone who would let me. Even the girl handing out liquor samples at the store (obviously the most awesome girl ever!). She was super excited about her sticker.

    Anyway, I concocted a little potion for those of us that want a festive green drink, but don’t like beer. This recipe is for a basic mojito, but I subbed cachaca (a Brazilian liquor similar to rum, but with a little more bite. It is most commonly used to make caipirinhas) for the rum. Enjoy!!


    Caipir-jito!

    • 2.5 oz cachaca
    • 2 teaspoons sugar
    • 1/2 lime
    • handful of mint
    • ice
    • soda water

    ingredientsStep 1: assemble all ingredients. Wash and cut the lime into eight pieces, and wash the mint.

    mintStep 2: Use about this much mint for one drink. You can leave the stems on for a little more flavor, or remove the leaves for a prettier look. Your choice.

    glassStep 3: Rub a few of the mint leaves all around the inside of the glass you plan to serve the drink in. It gives the drink way more flavor. This is a pro tip 😉

    muddledStep 4: Put all of the mint, even what you used in the glass, into whatever you plan to muddle in (a shaker, a wooden cup, the glass). Add half of the lime and two teaspoons of sugar. Muddle them all together- just smash them up until the juice is out of the limes. If you don’t have a muddler, you can use a spoon. Then add about a shot and a half of cachaca and muddle again. If you’re using a shaker, at this point add ice and shake it all up like crazy. If not, fill your glass with ice, then pour this mixture on top. If you used a shaker, just pour everything in the glass (you want to leave the lime peel and mint in). This picture illustrates how much room I had left at the top after pouring mine into the glass.

    finishedStep 5: To finish it off, top it off with soda water and garnish if you like.

    Bottoms up!

    Jillian